Introduction
Indian sandstone is widely used for UK patios, paths and garden terraces because it combines natural colour variation, a textured riven surface and practical durability. However, the finished paving will only perform properly when the ground preparation, drainage, mortar bedding, jointing and cleaning are all completed correctly.
This guide explains the full installation sequence for calibrated Indian sandstone paving. It is intended as a practical layout and installation reference rather than a substitute for a site-specific assessment by an experienced landscaper or builder.
Important: Indian sandstone should be laid on a full mortar bed. Dot-and-dab, ring bedding and isolated mortar spots can leave unsupported voids, encourage movement and create uneven moisture marks.
Indian Sandstone Laying Patterns
The laying pattern should be selected before the paving is ordered or installation begins. The chosen pattern affects the slab sizes required, the position of joints, the amount of cutting, material waste and the final appearance of the patio.
Single-size Indian sandstone paving can be installed in stack bond, running bond or third bond. Mixed-size patio packs should be installed according to a suitable laying plan so that the correct proportion of each slab size is maintained throughout the project.
| Pattern | Best suited to | Appearance | Main consideration |
|---|---|---|---|
| Stack Bond | Modern patios and accurately cut single-size paving | Formal, straight and structured | All horizontal and vertical joints must remain accurately aligned |
| Running Bond | Rectangular sandstone slabs, patios and paths | Balanced and less rigid than a grid | The offset should be planned to avoid narrow cuts at the perimeter |
| Third Bond | Long rectangular paving slabs | Contemporary with controlled joint movement | Each row is normally offset by approximately one third of the slab length |
| Mixed-Size Pattern | Four-size patio packs and traditional garden patios | Natural, varied and informal | A complete laying plan should be followed to maintain the correct slab ratio |


Important: The example diagrams explain the joint arrangement of each pattern. The slab colour, texture and exact dimensions shown in a diagram may differ from the Indian sandstone supplied for a particular project.
How to Choose the Correct Laying Pattern
The most suitable pattern depends on the paving format, patio dimensions, architectural style and the amount of cutting required.
- Choose stack bond for a highly structured contemporary appearance using consistent single-size slabs.
- Choose running bond for a balanced staggered layout that works well with rectangular slabs.
- Choose third bond for long-format slabs where a smaller offset produces a less repetitive arrangement.
- Choose a mixed-size pattern when installing four-size patio packs or creating a more traditional natural-stone appearance.
Before installation, dry-plan several rows and calculate the slab-and-joint module across the full width and length of the patio. Adjusting the starting position may prevent narrow cuts from appearing along walls, steps and external edges.
Before You Start
Check the site conditions
Inspect the area before ordering materials or starting excavation. Identify door thresholds, air bricks, inspection covers, drainage channels, retaining walls, steps, existing concrete and changes in ground level. The final paving level must not obstruct ventilation openings or direct water towards the building.
Measure the area accurately
Measure the length and width of the proposed patio in metres and multiply them to calculate the square meterage. For irregular areas, divide the design into rectangles or triangles and calculate each section separately.
Add an allowance for cuts, natural variation and accidental breakage:
- Simple rectangular layout: normally allow approximately 10% extra.
- Diagonal layouts, curves or numerous cuts: consider 12% to 15% extra.
- Mixed-size patio packs: follow the supplied pattern and pack coverage rather than ordering by individual slab count alone.
Inspect deliveries before installation
Open all crates and inspect the paving before work begins. Natural stone varies in colour, tone, veining and surface texture. Mix slabs from different crates while laying so that normal variation is distributed evenly across the patio.
Do not lay clearly damaged or unsuitable pieces in prominent positions. Minor edge chips can often be used for cuts, borders or concealed perimeter areas.
Materials and Tools
Recommended Construction Build-Up
| Layer | Typical thickness | Purpose |
|---|---|---|
| Indian sandstone slab | Commonly around 22 mm for calibrated paving | Finished wearing surface |
| Full mortar bed | Approximately 30–40 mm after compaction | Supports and levels the slab |
| Compacted sub-base | Often around 100 mm for a domestic pedestrian patio | Distributes load and limits settlement |
The exact construction depth depends on ground conditions, intended loading and local drainage requirements. Soft, made-up or waterlogged ground may require deeper excavation, geotextile separation or specialist ground improvement.
1. Set Out the Patio
Mark the perimeter using pegs, string lines or line-marking paint. Check that the proposed shape is square where required by measuring the diagonals. Equal diagonal measurements indicate that a rectangle is square.
Before excavation, dry-plan important lines such as door thresholds, steps, borders and inspection covers. Avoid leaving narrow slivers of paving along visible edges. Adjust the starting position so that perimeter cuts remain balanced and practical.
2. Establish Finished Levels
Set the finished paving level from stable reference points. Around a house, the paving surface should generally remain approximately 150 mm below the damp proof course unless a correctly designed drainage detail permits otherwise.
Check door thresholds, air bricks and external vents. The paving and mortar must not bridge the damp proof course or block ventilation.
3. Plan the Drainage Fall
The paved surface should normally fall away from buildings. A practical patio fall is often around 1:60 to 1:80, depending on the paving texture, site exposure and drainage arrangement. This is approximately 12.5–16.5 mm of fall per metre.
Use string lines or laser levels to establish the high and low points. Water should discharge to a suitable permeable area, drainage channel or designed outlet rather than onto neighbouring property or against a wall.
Example: Across a 4 m patio, a 1:80 fall creates approximately 50 mm of total level difference. A 1:60 fall creates approximately 67 mm.
4. Excavate the Area
For a typical pedestrian patio using a 22 mm slab, 30–40 mm mortar bed and 100 mm sub-base, excavation may be approximately 155–165 mm below the intended finished paving level.
Remove turf, roots, soft material and loose soil. The formation should be firm and reasonably even. Do not place the sub-base directly over unstable organic soil or uncompacted backfill.
5. Install Edge Restraints
Where the paving is not contained by a wall, kerb or existing structure, install a stable edge restraint. Edge restraints prevent the outer paving and bedding mortar from spreading or breaking away over time.
The restraint may be formed using kerbs, setts, bricks or a concrete haunch, depending on the design. It should be secure before the main paving is laid.
6. Lay and Compact the Sub-Base
Spread MOT Type 1 in layers rather than placing the full depth at once. Compact each layer thoroughly with a vibrating plate compactor. For a 100 mm finished sub-base, two compacted layers are generally more reliable than one deep loose layer.
Maintain the approximate drainage fall within the sub-base. The mortar bed should be used for final adjustment, not to correct major variations in the formation.
7. Dry-Lay and Blend the Stone
Arrange several slabs near the work area and blend material from different crates. When using a mixed-size patio pack, refer to the appropriate laying pattern before mixing mortar.
Natural riven sandstone may vary slightly in thickness, edge straightness and surface profile. Rotate individual slabs where necessary so that strong colour bands and surface features are distributed naturally.
8. Prepare the Mortar
A common bedding mortar is approximately 1 part cement to 4 or 5 parts sharp sand by volume. Add only enough clean water to produce a workable, cohesive mix. The mortar should hold its shape when placed but remain workable enough to compact beneath the slab.
A very wet mortar can shrink and stain the stone. An excessively dry mix may not bond or compact properly. Mix consistent batches so that bedding performance remains uniform across the patio.
9. Apply Slurry Primer
Brush dust and loose material from the underside of each slab. Immediately before laying, apply a continuous coating of proprietary slurry primer or suitable cementitious bonding slurry to the entire back face.
The slab should be placed while the primer remains wet and active. Do not allow the slurry to dry before bedding. Avoid getting primer on the visible face of the sandstone.
Why the primer matters: Calibrated sandstone may not develop a reliable bond to the mortar bed without a bonding slurry. Full underside coverage improves adhesion and reduces the risk of hollow or rocking slabs.
10. Lay the First Slab
Place enough mortar to create a complete bed beneath the slab. The bed should have no intentional voids, rings or isolated spots. Set the first slab carefully because it establishes the line, level and fall for the surrounding paving.
Lower the primed slab onto the mortar and tap it into position using a rubber mallet. Check across the face and along the intended fall with a long spirit level. Lift and reset the slab if substantial correction is required; do not repeatedly strike one area hard enough to crack the stone.
11. Maintain Joint Widths
For riven Indian sandstone, joints are commonly around 10–15 mm, although the correct width depends on the edge finish, slab tolerance and selected jointing material. Sawn-edge paving may permit narrower joints, while hand-cut edges normally require more tolerance.
Check the joint width visually and with spacers where practical, but do not force naturally variable slabs into an artificial grid that creates poor alignment elsewhere.
12. Follow the Laying Pattern
Mixed-size packs should be installed from a planned module rather than randomly. Follow the pattern orientation and maintain the intended ratio of slab sizes. Avoid four corners meeting at one point and avoid long uninterrupted joints unless the pattern specifically requires them.
Work from the laid surface only when it has cured sufficiently. Freshly laid slabs can move under body weight and disturb the falls.
13. Cut Slabs Safely
Measure cuts carefully and allow for the joint width. Use suitable masonry cutting equipment with a diamond blade. Wet cutting or effective dust suppression is strongly preferable because cutting sandstone and mortar products can generate respirable crystalline silica dust.
Wear suitable eye, hearing, respiratory and hand protection. Cutting should be completed in a controlled area away from finished paving, windows and parked vehicles.
14. Keep the Surface Clean
Remove mortar, slurry primer and cement splashes immediately using clean water and a soft brush or sponge. Do not smear cement residue across the riven face. Replace dirty cleaning water frequently.
Avoid strong acid cleaners. Acid can react with cement joints, alter some natural stone minerals and create permanent colour changes.
15. Allow the Bedding to Cure
Protect newly laid paving from foot traffic, heavy rain and frost. The required curing period depends on weather, mortar consistency and site exposure. As a practical rule, do not rush jointing or trafficking while slabs can still move.
Covering may be needed in wet or hot weather, but coverings must not trap condensation against the stone or mark the surface.
16. Joint the Paving
Joints should be full, compact and suitable for exterior use. Two common approaches are:
- Traditional mortar pointing: often based on cement and plastering or building sand, installed carefully without smearing the stone.
- Proprietary jointing compound: installed strictly in accordance with the manufacturer’s requirements for joint depth, width, moisture and weather.
Do not fill only the upper surface of a deep empty joint. Shallow or poorly compacted pointing can crack, loosen and allow weed growth.
17. Clean and Inspect the Finished Patio
After jointing, inspect the whole area before materials fully cure. Check for mortar residue, loose joints, rocking slabs, ponding water, chipped visible edges and blocked drainage outlets.
A light water test can help identify local low spots, but do not flood uncured joints or newly laid mortar.
18. Sealing Indian Sandstone
Sealing is optional. A suitable breathable natural-stone sealer may reduce water absorption and help resist oil, food, leaf and organic staining. It does not make sandstone stain-proof or maintenance-free.
Only seal when the paving and joints are fully cured, clean and dry. Always test the product on an inconspicuous area because sealers can deepen colour, alter sheen or highlight natural variation.
Common Installation Errors
- Laying directly onto soil, sand or an uncompacted base.
- Using dots, dabs or ring bedding instead of a full mortar bed.
- Omitting slurry primer from the slab underside.
- Setting paving too close to the damp proof course.
- Creating insufficient fall or directing water towards the building.
- Using mortar to compensate for a badly prepared sub-base.
- Allowing cement or slurry to dry on the stone face.
- Using narrow joints that do not accommodate hand-cut edge variation.
- Jointing before the bedding has stabilised.
- Sealing damp, dirty or insufficiently cured paving.
Final Installation Checklist
- The sub-base is fully compacted and stable.
- The finished paving remains below the damp proof course.
- The patio falls away from buildings to a suitable drainage point.
- Every slab is supported by a full mortar bed.
- Slurry primer covers the full underside of each slab.
- Joint widths are suitable and visually consistent.
- Mixed-size packs follow a controlled laying pattern.
- No slab rocks, sounds hollow or traps standing water.
- All joints are full and securely finished.
- Cement contamination has been removed before curing.
Frequently Asked Questions
How deep should I excavate for Indian sandstone paving?
A typical domestic patio may require approximately 155–165 mm below finished level, allowing for around 100 mm of compacted sub-base, 30–40 mm of mortar and the sandstone slab. Poor ground conditions may require a deeper construction.
What mortar mix should I use?
A common bedding mix is approximately 1 part cement to 4 or 5 parts sharp sand by volume. It should be cohesive and workable rather than wet or fluid.
Does Indian sandstone need slurry primer?
Applying a full coating of suitable slurry primer to the underside is strongly recommended because it improves the bond between calibrated sandstone and the bedding mortar.
How much fall should a patio have?
A fall of approximately 1:60 to 1:80 is often used for domestic patios, provided water drains away from buildings and reaches a suitable outlet.
How wide should the joints be?
Riven hand-cut sandstone commonly uses joints of around 10–15 mm. The final width should reflect the edge tolerance and the requirements of the selected jointing product.
Can sandstone be laid directly onto concrete?
It can be laid over a sound, stable and suitably drained concrete base using an appropriate bonded mortar system. Existing concrete must not be loose, contaminated or positioned at an unsuitable level.
When can I walk on newly laid paving?
Only after the bedding mortar has cured sufficiently to prevent movement. The time varies with temperature, moisture and mortar conditions, so avoid relying on a fixed minimum where the site remains cold or wet.
Should Indian sandstone be sealed?
Sealing is optional. A compatible breathable sealer may reduce staining and simplify maintenance, but it cannot guarantee complete stain prevention.
Download Patio Laying Patterns
The four pattern diagrams below are displayed as two columns and two rows on desktop screens. On mobile devices they automatically change to one column, producing four separate rows.
600 Series – 4 Size Patio Pack (18.90 m²)

Select the image to open or download the full pattern.
600 Series – 4 Size Patio Pack (15.30 m²)

Select the image to view the complete 600-series pattern.
560 Series – 5 Size Patio Pack (15.76 m²)

Use the module repeatedly while avoiding unintended long joints.
560 Series – 3 Size Patio Pack (19.30 m²)
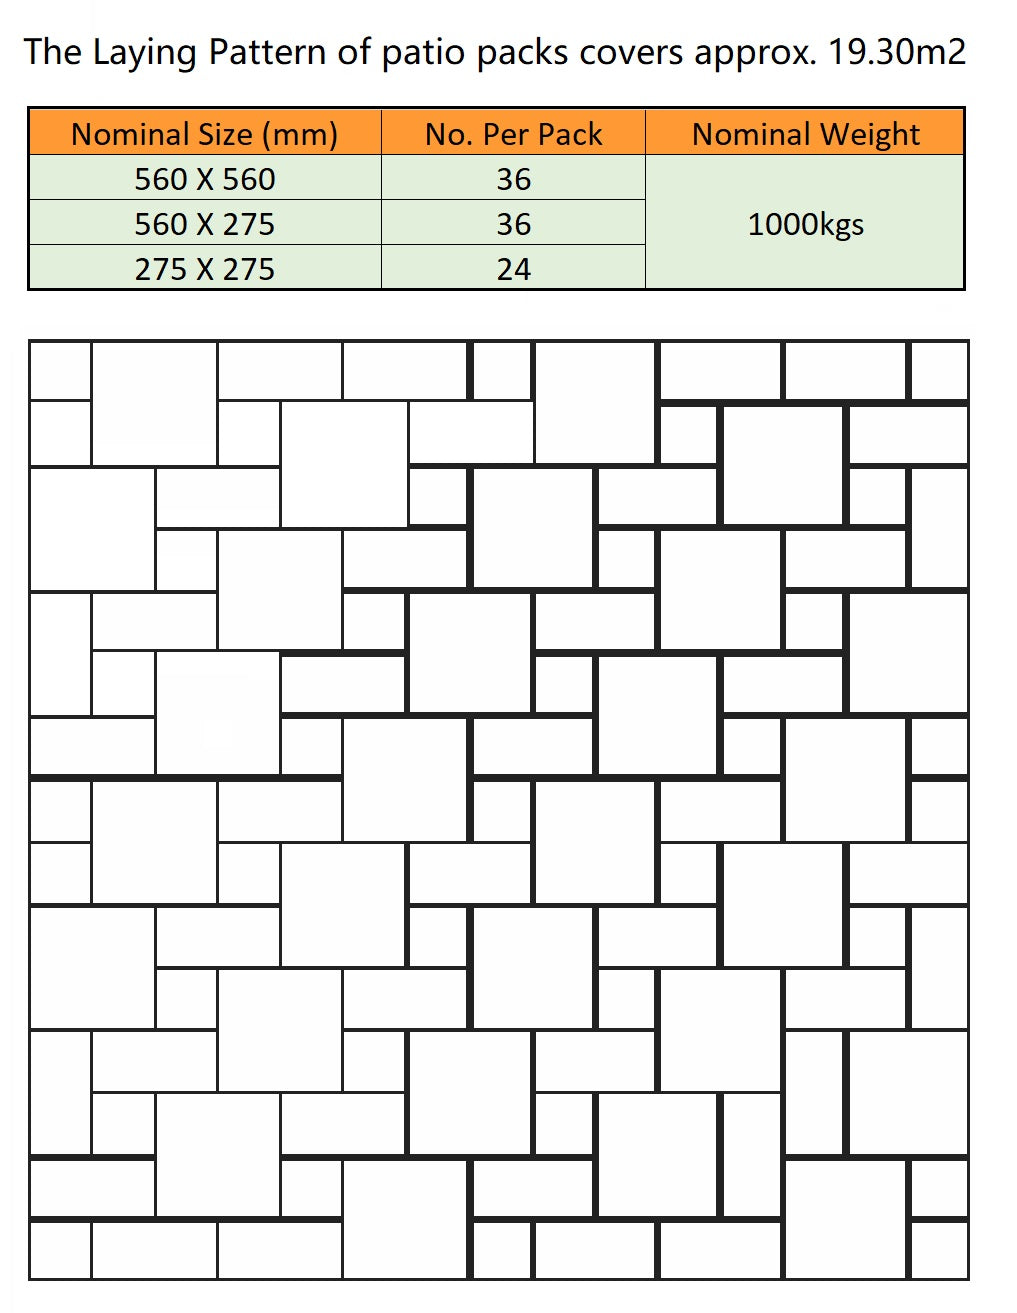
Check slab quantities before beginning each repeated pattern module.